Part III: Extension Project Structure and Fundamentals

Parts of Series
- Introduction to Burp Extender
- Setting Up Extension Development Tools
- Extension Project Structure and Fundamentals
- Diving deeper into Extender API Interfaces
- Exploration - Intruder Payload Processing
In the last part of the series, we saved the interface files from Extender to a folder called API. The structure should look similar to this (snipped for brevity) :
Prakhars-MBP% tree API/

API/
└── burp
    ├── IBurpExtender.java
    ├── ...
    └── ...

1 directory, 41 files
We need to move the API folder to NetBeansProjects folder for easier reference when importing to our extension codebase.
Creating Your First Burp Extension Project
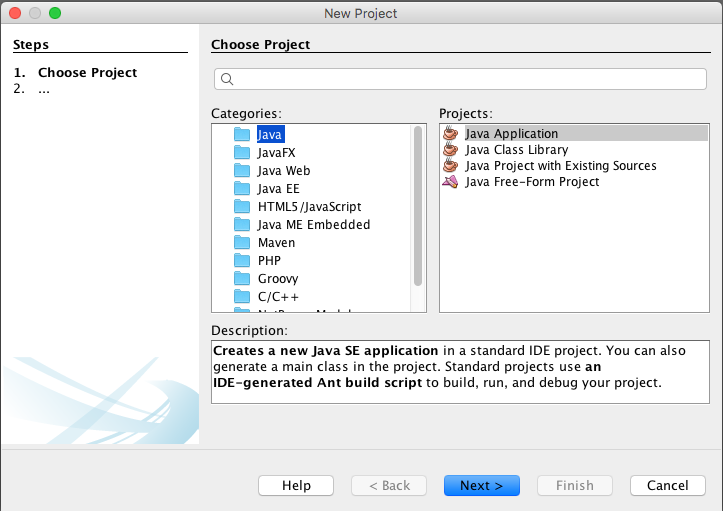
We'll create our first Burp Extension using NetBeans. We have to fire-up NetBeans IDE and create a new project from File > New Project and select the default options which is Java and Java Application then move to the next step.
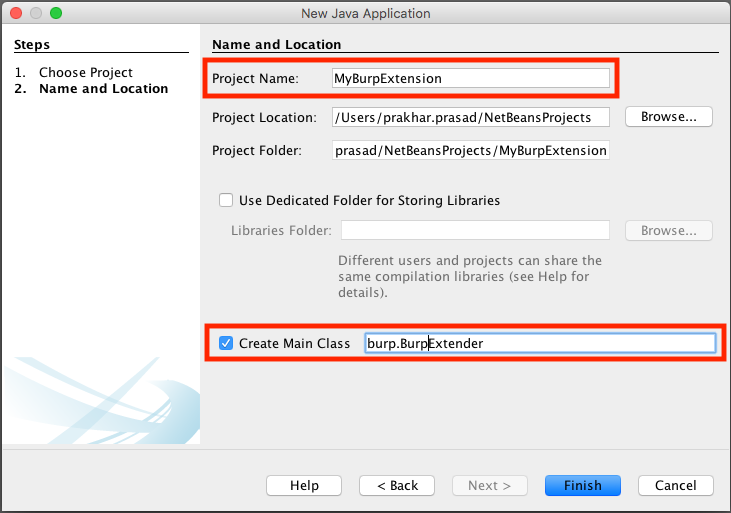
In the next wizard page, write down the Project Name of the Burp Extension which will be MyBurpExtension (in this example) and create main class as burp.BurpExtender then continue further:
The IDE will auto-generate code something like this:
package burp;

public class BurpExtender {

    /**
     * @param args the command line arguments
     */
    public static void main(String[] args) {
        // TODO code application logic here
    }
}
We need to remove the main() function and all associated code because we won't need them:
package burp;

public class BurpExtender {

}
Adding Burp Extender APIs to the ProjectTo add the Extender APIs to our project, we have to import the API folder into the project properties - File > Project Properties > Sources and add the folder into Source Package Folders:
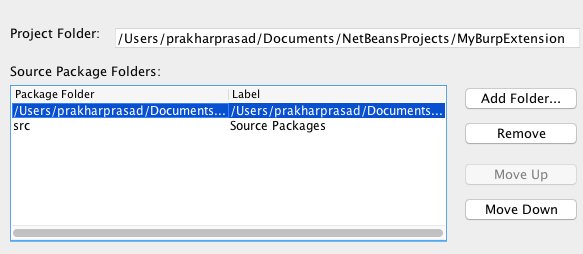
This will ensure compilation of the code and auto-completion in the IDE.
Let's proceed to the fundamentals of Burp Extender API.
Fundamentals
When writing a barebones Burp Extension we typically perform the following:
- Create a package called
burpand write a class with nameBurpExtender(henceburp.BurpExtenderduring the NetBeans project creation). - Implement an Extender interface called
IBurpExtenderin ourBurpExtenderclass. Every extension needs to have this. - Override the
registerExtenderCallbacks()method fromIBurpExtender.
The whole process looks daunting at first but is extremely simple to understand. When Burp Suite loads any extensions it looks for a class called BurpExtender and then calls registerExtenderCallbacks() method; while calling it, passes an object which we'll discuss shortly and we utilise that object for different purposes. Consider registerExtenderCallbacks() as an entry-point to your extension.
The skeleton Burp Extension will look like this:
package burp;

public class BurpExtender implements IBurpExtender{
    @Override
    public void registerExtenderCallbacks(IBurpExtenderCallbacks callbacks) {
        // extension logic here
    }
}
In the above code, callbacks is the object which Burp Suite will pass to the extension when loading it, the callbacks is of type IBurpExtenderCallbacks which is an Extender interface. callbacks will expose multiple methods which can be used to interact Burp Suite such as :
setExtensionName(): Set our extension namemakeHttpRequest(): Send an HTTP request and retrieve its response.issueAlert(): Send a message to Burp’s Alert Tab.getBurpVersion(): Figure-out the version of Burp Suite.isInScope(): Check if a URL is in Burp Project’s scope or not.
There are tons of methods which can be used but is beyond the series.
Burp Extension - Hello World!
Enough theory, let's write a Hello World extension to start with. We'll follow the some procedure and use the issueAlert() method from callbacksobject to display the famous Hello World string:
package burp;

public class BurpExtender implements IBurpExtender{
    @Override
    public void registerExtenderCallbacks(IBurpExtenderCallbacks callbacks) {
        callbacks.setExtensionName("Burp Extension - Prakhar Prasad");
        callbacks.issueAlert("Hello World!");
    }
}
The above code calls setExtensionName() method to set the name of the extension that will be visible in Burp Suite UI; there-after issueAlert() is used to send an alert to the Alert tab of Burp Suite with a message. Please note that the parameters and return types of the functions have to referred from their API reference. The Extender API reference is the to-go place to discover golden extensibility gems offered by Burp Suite.
Compile the code using Run > Build Project and if everything is done correctly then a JAR file will be dropped under /dist directory of the project folder inside NetBeansProjects. The JAR file can be directly loaded into Burp Suite as an extension, the end result should look like following:
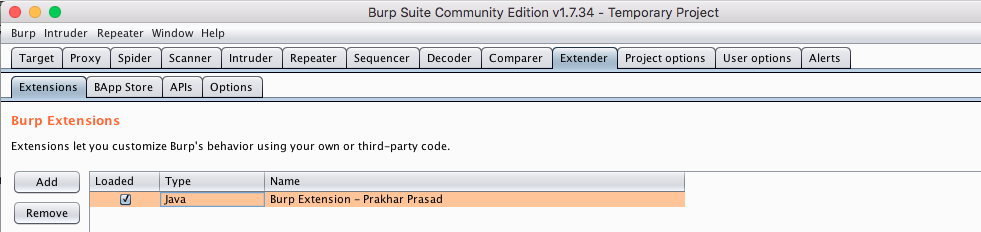
Name of the Extension is visible.

Extension says "Hello World!"
Exercise #1: Utilise the getBurpVersion() method from IBurpExtenderCallbacks and display the version of Burp Suite in which the extension is currently loaded.
That's all for now. We'll do some more practical and useful stuff in next posts of this series.